Construire une DApp Multi-Paiements sur Morph avec Foundry

Bonjour les développeurs 👋
Ce tutoriel vous propose une approche pratique pour créer une application décentralisée (DApp) capable de gérer plusieurs types de paiements ou de devises, en utilisant Foundry, un framework populaire pour le développement de contrats intelligents.
Prérequis 📚
Node JS (v16 ou plus)
NPM (v6 ou plus)
Solidity
Metamask
Ethers de testnet
JavaScript
Outils de développement 🛠️
- Foundry
curl -L https://foundry.paradigm.xyz | bash
Commençons à coder... 👨💻
Étape 1 : Créer un nouveau répertoire de projet
mkdir batchsender-dapp
- Allez dans le répertoire du projet nouvellement créé
cd batchsender-dapp
Étape 2 : Initialiser Foundry pour le développement de contrats intelligents
✍️ Foundry crée un nouveau dépôt Git ; nous pouvons empêcher cela en ajoutant une option à la commande.
forge init --no-git
Structure du projet Foundry :
script
src
test
✍️ Chaque dossier contient un fichier. Supprimez-les un par un pour avoir un espace de travail propre.
Étape 3 : Créer le code du contrat intelligent
Allez dans le répertoire
srcCréez un nouveau fichier nommé
Batchsender.solMettez à jour
Batchsender.solavec ce code :
// SPDX-License-Identifier: MIT
pragma solidity ^0.8.25;

contract Batchsender {
    // Custom Error for mismatched recipients and amounts
    error MismatchedArrayLengths(
        uint256 recipientsLength,
        uint256 amountsLength
    );

    // Custom error for insufficient ethers
    error NotEnoughEth();

    // Custom Error for failed transfer
    error TransferFailed(address recipients, uint256 amounts);

    // Event to log each successful transfer
    event TokenSent(address indexed recipients, uint256 amounts);

    // Payable function for Ether transfer
    function sendToken(
        address payable[] calldata recipients,
        uint[] calldata amounts
    ) external payable {
        // Check if recipient length and amount length are the same
        if (recipients.length != amounts.length) {
            revert MismatchedArrayLengths(recipients.length, amounts.length);
        }

        // Calculate the total amount to be sent
        uint totalAmount = 0;
        for (uint i = 0; i < amounts.length; i++) {
            totalAmount += amounts[i];
        }

        // Ensure the sent amount is equal or greater than the total amount
        if (msg.value < totalAmount) {
            revert NotEnoughEth();
        }

        // Loop through recipients array to match recipients to amounts
        for (uint i = 0; i < recipients.length; i++) {
            (bool sendSuccess, ) = recipients[i].call{value: amounts[i]}("");
            if (!sendSuccess) {
                revert TransferFailed(recipients[i], amounts[i]);
            }

            // Emit event for each successful transfer
            emit TokenSent(recipients[i], amounts[i]);
        }
    }
}
Étape 4 : Compiler le code du contrat intelligent
forge build
- Résultat de la compilation :
[⠊] Compiling...
[⠢] Compiling 1 files with Solc 0.8.27
[⠆] Solc 0.8.27 finished in 139.58ms
Compiler run successful!
Étape 5 : Écrire le code de test en Solidity
Allez dans le répertoire
testCréez un nouveau fichier nommé
Batchsender.t.solMettez à jour
Batchsender.t.solavec ce code :
// SPDX-License-Identifier: MIT
pragma solidity ^0.8.25;

import {Test, console} from "forge-std/Test.sol";
import {Batchsender} from "../src/Batchsender.sol";

contract BatchsenderTest is Test {
    Batchsender public batchsender;

    function setUp() public {
        // Deploy the contract before each test
        batchsender = new Batchsender();
    }

    function test_sendToken() public {
        address payable[] memory recipients = new address payable[](2);
        uint[] memory amounts = new uint[](2);
        recipients[0] = payable(0x6c5fa1b41990f4ee402984Bcc8Bf6F4CB769fE74);
        recipients[1] = payable(0x55829bC84132E1449b62607B1c7bbC012f0326Ac);
        amounts[0] = 100; //wei
        amounts[1] = 200; //wei
        batchsender.sendToken{value: 300}(recipients, amounts);
        assertEq(address(recipients[0]).balance, amounts[0]);
        assertEq(address(recipients[1]).balance, amounts[1]);
    }
}
✍️ Vous pouvez utiliser vanity-eth.tk pour générer des adresses de portefeuilles pour vos tests.
Étape 6 : Exécuter les tests
forge test --match-path test/Batchsender.t.sol
- Le résultat du test devrait ressembler à ceci :
[⠊] Compiling...
[⠘] Compiling 24 files with Solc 0.8.27
[⠃] Solc 0.8.27 finished in 733.97ms
Compiler run successful!

Ran 1 test for test/Batchsender.t.sol:BatchsenderTest
[PASS] test_sendToken() (gas: 90741)
Suite result: ok. 1 passed; 0 failed; 0 skipped; finished in 8.33ms (1.46ms CPU time)

Ran 1 test suite in 151.38ms (8.33ms CPU time): 1 tests passed, 0 failed, 0 skipped (1 total tests)
Étape 7 : Déployer le contrat intelligent sur le testnet Morph Holesky
- Créez un fichier
.envdans le répertoire du projet et ajoutez trois (3) variables d'environnement.
MORPH_RPC_URL="https://rpc-quicknode-holesky.morphl2.io"
DEV_PRIVATE_KEY="0x-insert-your-private-key"    // Prefix with 0x
CONTRACT_ADDRESS=""
✍️ L'information
CONTRACT_ADDRESSsera ajoutée après le déploiement.
Allez dans le répertoire
scriptet créez un nouveau fichier nomméBatchsender.s.solAjoutez ce code pour le déploiement du contrat :
// SPDX-License-Identifier: MIT
pragma solidity ^0.8.25;

import {Script, console} from "forge-std/Script.sol";
import {Batchsender} from "../src/Batchsender.sol";

contract BatchsenderScript is Script {
    Batchsender public batchsender;

    function setUp() public {}

    function run() public {
        // Save Private key as variable for reusability
        uint privateKey = vm.envUint("DEV_PRIVATE_KEY");

        // start deployment...with Private Key
        vm.startBroadcast(privateKey);

        // Log Account to the console
        address account = vm.addr(privateKey);
        console.log("Deployer Account address: ", account);

        batchsender = new Batchsender();

        vm.stopBroadcast();
    }
}
Étape 8 : Exécuter le script de déploiement
- Chargez les informations d'environnement dans le terminal
source .env
- Confirmez l'adresse du compte du déployeur
forge script script/Batchsender.s.sol:BatchsenderScript
- Cette exécution retournera l'adresse de portefeuille associée à la clé privée du déployeur.
[⠊] Compiling...
[⠑] Compiling 2 files with Solc 0.8.27
[⠘] Solc 0.8.27 finished in 650.26ms
Compiler run successful!
Script ran successfully.
Gas used: 259115

== Logs ==
  Deployer Account address:  0x4E1856E40D53e2893803f1da919F5daB713B215c
- Simulez le contrat intelligent
forge script script/Batchsender.s.sol:BatchsenderScript --rpc-url $MORPH_RPC_URL
- Résultat de la simulation réussie :
[⠊] Compiling...
No files changed, compilation skipped
Script ran successfully.

== Logs ==
  Deployer Account address:  0x4E1856E40D53e2893803f1da919F5daB713B215c

## Setting up 1 EVM.

==========================

Chain 2810

Estimated gas price: 0.15063575 gwei

Estimated total gas used for script: 340061

Estimated amount required: 0.00005122534378075 ETH

==========================

SIMULATION COMPLETE. To broadcast these transactions, add --broadcast and wallet configuration(s) to the previous command. See forge script --help for more.
✍️ Cette exécution crée automatiquement un nouveau répertoire nommé "broadcast" dans le projet pour faciliter le déploiement du contrat intelligent.
- Exécution finale pour déployer le contrat
forge script script/Batchsender.s.sol:BatchsenderScript --rpc-url $MORPH_RPC_URL --broadcast --private-key $DEV_PRIVATE_KEY --legacy
- Le résultat du déploiement devrait ressembler à ceci :
[⠊] Compiling...
No files changed, compilation skipped
Script ran successfully.

== Logs ==
  Deployer Account address:  0x4E1856E40D53e2893803f1da919F5daB713B215c

## Setting up 1 EVM.

==========================

Chain 2810

Estimated gas price: 0.14963575 gwei

Estimated total gas used for script: 340061

Estimated amount required: 0.00005088528278075 ETH

==========================

##### 2810
✅  [Success]Hash: 0xe65413c0b8ff406c18c33b77c385bc3d46bcd9305030dd49aa2277d3c90bf69a
Contract Address: 0x8D69CCBf55ce078d9c9838a8861e0c827Dd4f2ff
Block: 11252084
Paid: 0.0000391521939875 ETH (261650 gas * 0.14963575 gwei)

✅ Sequence #1 on 2810 | Total Paid: 0.0000391521939875 ETH (261650 gas * avg 0.14963575 gwei)


==========================

ONCHAIN EXECUTION COMPLETE & SUCCESSFUL.
✍️ Copiez l'adresse du contrat pour compléter la variable CONTRACT_ADDRESS.
Étape 9 : Intégrer l'interface avec NextJs
npx create-next-app@latest
✍️ Nommez votre interface "frontend" et sélectionnez la configuration par défaut pour le reste.
Étape 10 : Installer les plugins pour le développement
- Installez les trois (3) dépendances nécessaires pour le développement côté client.
npm install ethers bootstrap react-csv-importer
Étape 11 : Créer le composant frontend
Ouvrez le répertoire
srcLe composant frontend se trouve dans
app/page.jsPour recommencer à zéro, remplacez le code par celui-ci :
"use client"

export default function Home() {
  return ();
}
- Mettez à jour les imports :
"use client"

import { useState } from "react";
import { Importer, ImporterField } from "react-csv-importer";
import { ethers, Contract } from "ethers";

export default function Home() {
  return ();
}
- Importez l'ABI du contrat :
// Import contract ABI
import {abi as contractABI} from '../../../out/Batchsender.sol/Batchsender.json';
- Stockez l'adresse du contrat dans une variable :
// Contract address
const contractAddress = "0x8D69CCBf55ce078d9c9838a8861e0c827Dd4f2ff";
- Créez une variable objet pour l'explorateur blockchain :
// Blockchain Explorer object
const blockchainExplorerUrl = {
  2810: "https://rpc-quicknode-holesky.morphl2.io",
};
- Mettez à jour les variables d'état :
// Some code...

export default function Home() {

  // State variables
  const [payments, setPayments] = useState(undefined);
  const [sending, setSending] = useState(false);
  const [blockchainExplorer, setBlockchainExplorer] = useState();
  const [error, setError] = useState(false);
  const [transaction, setTransaction] = useState(false);

  return ();
}
- Créez la fonction pour envoyer des paiements
export default function Home() {
  // Some state variable codes...

    // Function for sending payments
    const sendPayments = async () => {
        // Connect to Metamask
        const provider = new ethers.BrowserProvider(window.ethereum);
        const signer = await provider.getSigner();

        const chainIdBigInt = (await provider.getNetwork()).chainId;
        const chainId = Number(chainIdBigInt); // convert to interger;

        setBlockchainExplorer(blockchainExplorerUrl[chainId.toString()]);

        // Show feedback to users
        setSending(true);

        // Format arguements for smart contract => Convert CSV row to column
        const { recipient, amount, total } = payments.reduce(
          (acc, val) => {
            acc.recipient.push(val.recipient);
            acc.amount.push(val.amount);
            acc.total += Number(val.amount);
            return acc;
          },
          {
            recipient: [],
            amount: [],
            total: 0,
          }
        );

        // Send transaction
        const batchsenderContract = new Contract(
          contractAddress,
          contractABI,
          signer
        );

        try {
          const transaction = await batchsenderContract.sendToken(
            recipient,
            amount,
            {
              value: total,
            }
          );
          const transactionReceipt = await transaction.wait();
          setTransaction(transactionReceipt.hash);
        } catch (error) {
          console.log(error);
          setError(true);
        }
      };

  return ( );
}
- Mettez à jour la structure du composant JSX :
export default function Home() {
// Some state variable and function codes...
return (
<>
<div className="container-fluid mt-5 d-flex justify-content-center">
<div id="content" className="row">
<div id="content-inner" className="col">
<div className="text-center">
<h1 id="title" className="fw-bold">
BATCHSENDER
</h1>
<p id="sub-title" className="mt-4 fw-bold">
Send multiple payments <br />{" "}
<span>in just one transaction</span>
</p>
</div>
<Importer
dataHandler={(rows) => setPayments(rows)}
defaultNoHeader={false} // optional, keeps "data has headers" checkbox off by default
restartable={false} // optional, lets user choose to upload another file when import is complete
>
<ImporterField name="recipient" label="recipient" />
<ImporterField name="amount" label="amount" />
<ImporterField name="asset" label="asset" />
</Importer>
<div className="text-center">
<button
className="btn btn-primary mt-5"
onClick={sendPayments}
disabled={sending || typeof payments === "undefined"}
>
Send transactions
</button>
</div>
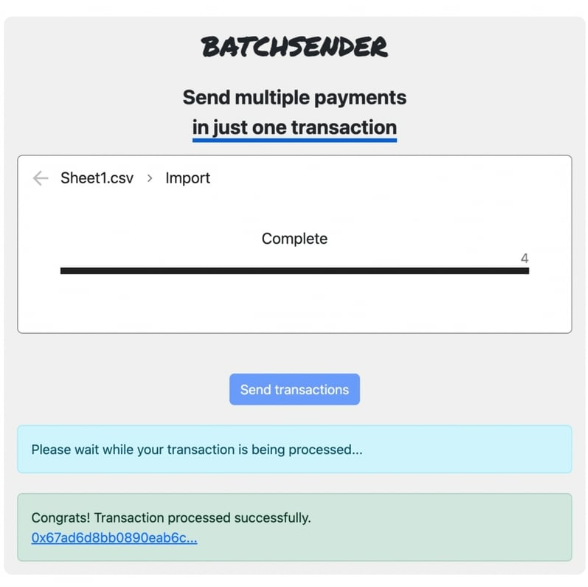
{sending && (
<div className="alert alert-info mt-4 mb-0">
Please wait while your transaction is being processed...
</div>
)}
{transaction && (
<div className="alert alert-success mt-4 mb-0">
Congrats! Transaction processed successfully. <br />
<a
href={`${blockchainExplorer}/${transaction}`}
target="_blank"
>{`${transaction.substr(0, 20)}...`}</a>
</div>
)}
{error && (
<div className="alert alert-danger mt-4 mb-0">
Oops...there was an error. Please try again later!
</div>
)}
</div>
</div>
</div>
</>
);
}
Étape 12 : Ajouter des styles au composant
Allez dans le répertoire
src/appCréez un nouveau fichier nommé
style.cssMettez à jour
style.cssavec ce code :
#content {
    width: 700px;
  }

  #content-inner {
    background-color: rgba(240, 240, 240);
    border-radius: 10px;
    padding: 1em;
  }

  #title {
    font-family: "Permanent Marker", cursive;
    font-size: 2em;
    font-style: normal;
    font-weight: 400;
  }

  #sub-title {
    font-size: 1.5em;
  }

  #sub-title span {
    border-bottom: 5px solid #085ed6;
  }

  #CSVImporter_Importer {
    margin-top: 3em;
  }
Étape 13 : Configurer la structure de la mise en page
Ouvrez le fichier
layout.jsRemplacez le code par ceci :
import "bootstrap/dist/css/bootstrap.min.css";
import "react-csv-importer/dist/index.css";
import "./style.css";

export const metadata = {
  title: "Batchsender",
  description: "Make multiple crypto payments in one click",
};

export default function RootLayout({ children }) {
  return (
    <html lang="en">
      <head>
        <link rel="preconnect" href="https://fonts.googleapis.com" />
        <link rel="preconnect" href="https://fonts.gstatic.com" crossorigin />
        <link
          href="https://fonts.googleapis.com/css2?family=Permanent+Marker&display=swap"
          rel="stylesheet"
        />
      </head>

      <body>{children}</body>
    </html>
  );
}
Étape 14 : Interagir avec la DApp
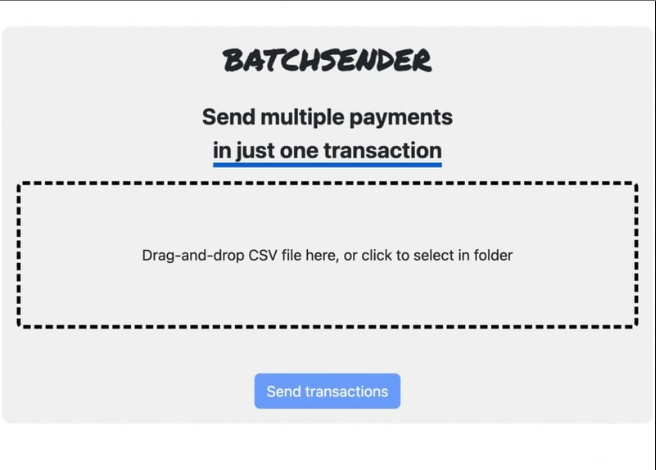
- Pour commencer à interagir avec la DApp, lancez le projet dans le navigateur
npm run dev
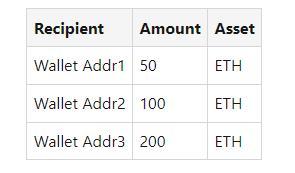
- Créez une feuille Excel avec les informations de vos transactions dans ce format :
Exportez ce fichier en
.csvFaites glisser et déposez votre fichier
.csvdans la zone prévue ou cliquez pour en sélectionner un.
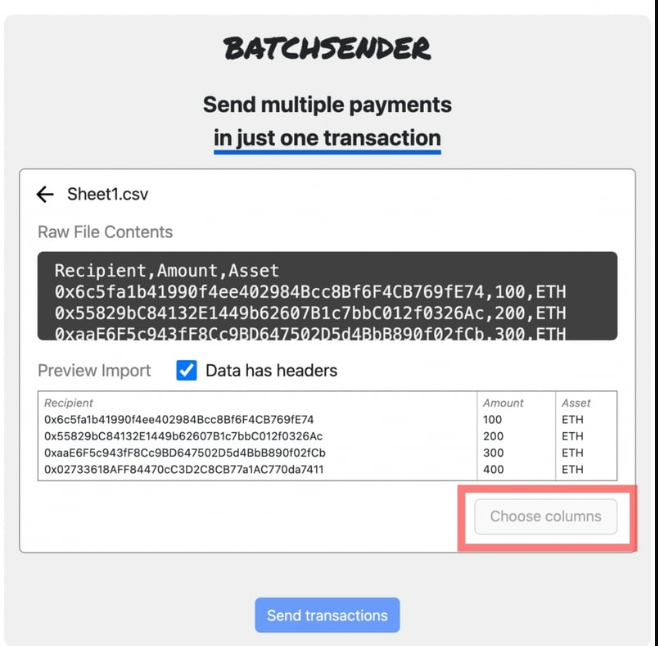
- Cliquez sur "Importer" pour charger les informations dans la DApp pour traitement
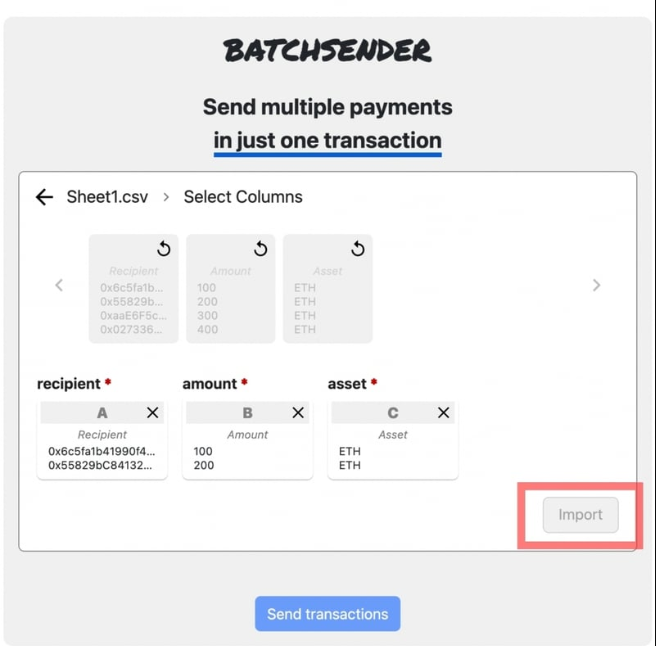
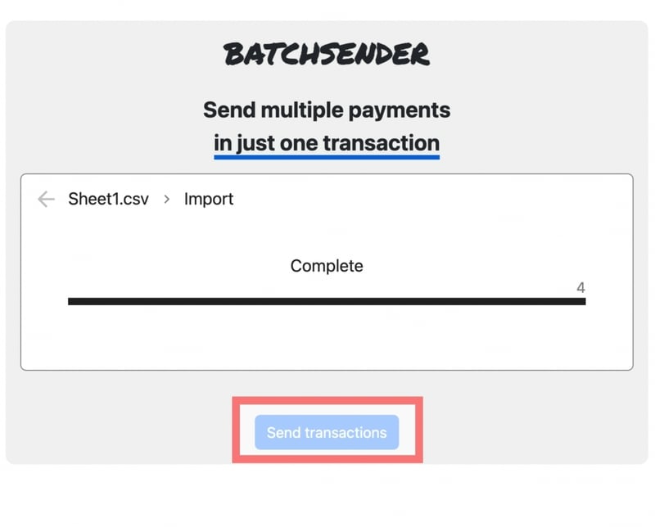
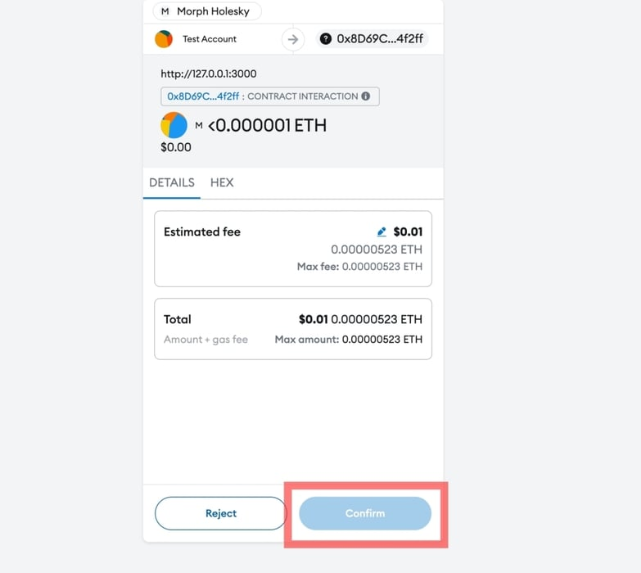
- Cliquez sur "Envoyer les transactions" pour effectuer les paiements en un clic
Conclusion
Dans ce guide, nous avons utilisé les outils les plus récents pour créer et déployer une application décentralisée sur la blockchain Morph, une solution Layer 2 qui combine les avantages des rollups zK et Optimistic pour des transactions rapides et sécurisées.
Bon codage... 🎉